New pattern: Paper Planes

The third pattern in my 'Paper Hats' set is out - this one's called Paper Planes. A tutorial for making my favourite made-of-actual-paper planes (like the ones in the photos) is included below. I couldn't find one online for this method, so I made my own. :)


Features:
  • textured paper-plane shapes, outlined with twisted stitches
  • a cosy garter-stitch brim
  • both charted and written instructions
  • five sizes - for babies, kids, and adults
  • requires only one 50g ball of Merino Soft 4ply from Skeinz
    (or 85-185 yards of 4ply/sock/fingering weight yarn)

There are two kinds of twisted stitches used: the 'normal' one, i.e. knitting through the back loop of a stitch, plus its mirror image, which is slightly more complicated. You slip the stitch knitwise, then slip it back the left needle purlwise, and finally knit the stitch. I've abbreviated this as 'skw spw k', which in my head tends to turn into 'skew spew knit'!


--------------------------------------------------------------------------------------------

Best Paper Planes
- A tutorial by Amy van de Laar

You will need a pair of scissors, and a sheet of paper - printer paper is fine, or coloured paper if you choose. I usually use a sheet of A4 paper (or a halved sheet of A4). Take care to line up the edges/corners well when you make your folds, and try to make your folds nice and crisp.

1. Fold your paper in half lengthwise, and open it out again:


2. Fold each of the top corners down, to meet the central fold from step 1:


3. Fold the top triangle down, lining up the point with the central fold:


4. Fold your rectangle in half lengthwise, with your folded triangle visible on the outside:


5. Snip a small-ish square out of the top outer corner:


6. Open out your rectangle, with your folded triangle visible on top:


 7. Fold each of the top corners down, to meet the central fold:


8.  Fold the little triangle up, so that the folded parts are 'locked' in place:


9.  Fold your plane in half lengthwise, with the folded parts visible on the outside:


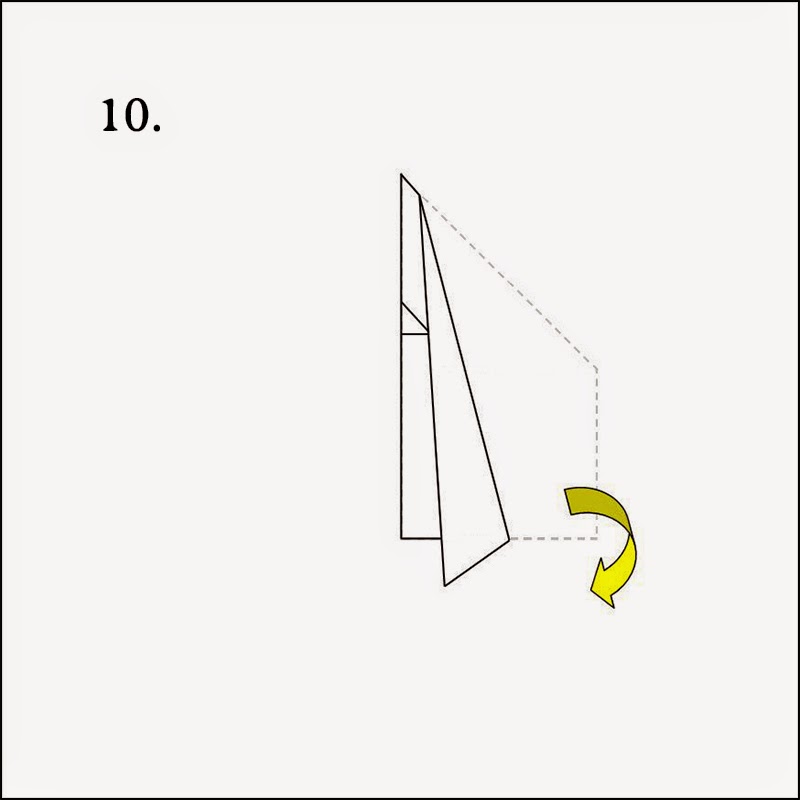
10. Fold down your wings (flight-testing will help you find the best angle):


11. Test out your airplane!


© Amy van de Laar 2014.

Dyeing with lichen

(Photo by Dad aka Jos)

On the way back from Napier, Dad and I collected some Old man's beard or Tree Moss lichen (possibly Usnea arida) from the roadside, so I could use it for dyeing yarn. The old fallen pine branches were practically dripping with lichen, so I couldn't resist grabbing a few handfuls...

(Also by Dad)

I've dyed yarn with lichen before, using what I was able to scrape from Mum and Dad's birch trees. I like the fact that there's no need to use a mordant when dyeing with lichen (less hassle), and I like the earthy/salty/woody smell of the simmering dyepot. On my first attempt I got some lovely warm golden tones, which I used to make a Fibonacci-striped scarf:

My Baktus scarf, from September 2009

Unfortunately I wasn't able to track down the book I'd used as a guide last time, or the notes I'd taken, so my method this time around is probably a bit different! It's a more straightforward process than I used for last year's eucalyptus experiment - I decided to 'cook' the lichen and dye the yarn at the same time, rather than making the dye liquid in advance.

What I did:

I started with 28g of lichen, and a 200g skein of undyed yarn ('Naked' Organic Merino 4ply from Skeinz).


I used a big square of cheesecloth (thanks Mum) to make a lichen 'teabag' tied with string. I poured 8L of cold water into a big stockpot, threw in the 'teabag', and let it soak in the cold water for 1 hour.


Then I added the skein of yarn, let it soak for 20 minutes to make sure it was wet through, and turned on the heat.

I slowly (over the course of about an hour) heated the pot to a very low simmer. I kept the pot at that temperature for an hour and a half, giving the lichen 'teabag' the occasional prod and squeeze with a smooth-sanded stick (thanks Dad), and gently nudging the yarn to ensure a more even colour-distribution.


The yarn didn't seem to be changing colour any more, so I turned off the heat.

The colour was much lighter than I'd hoped - I think didn't use nearly enough lichen for this quantity of yarn! So Dad and I collected more lichen, this time from the birch and prunus trees in the garden. This batch weighed 77.7g (about three times as much as the first batch), and it looks like some of it might be a different variety.


I switched the old lichen in the 'teabag' for the new batch, and left it soaking in the old dyebath overnight (minus the yarn).

The next day I repeated the heating process, letting it simmer very gently for an hour. I let the pot cool completely before retrieving my yarn. I gently washed it with wool-wash, rinsed it again, squeezed it out, and hung it up to dry. The second round of dyeing left the yarn quite a bit darker, as I'd hoped! It has felted a little bit after the abuse of being dyed twice - I must have been a bit too rough with it. It's still usable thank goodness, it was just a bit of a pain to wind into balls.


Not a bad result! I really like the semi-solid effect. I think it will make a very nice shawl or large cowl. :)

Free pattern: On the Record

I made a batch of these crocheted record coasters as a house-warming present for Chloe and Celena, who have recently moved into a new flat:


They're quick and easy, require only small amounts of yarn, and they're reversible too! I used the half-double crochet stitch for most of the rounds, because I like the ridges it creates (perfect for a record). Each coaster is about 4.5" wide, which is big enough for a large mug. If you want smaller coasters, omit Round 5 in the instructions.
 
If you're new to crochet or would like a refresher, there are some good tutorials out there. I like the detailed photo-tutorials at the Attic24 blog (e.g. Flat Circle), the clear diagrams at
How to Read a Crochet Pattern, and the beginners' series Crochet School. As for actual books (gasp), my favourite is Debbie Stoller's The Happy Hooker.

Photos of each stage in this pattern can be found on my Ravelry project page: House-warming coasters.

--------------------------------------------------------------------------------------------

On the Record 
by Amy van de Laar

This pattern uses US crochet terms for slip-stitch, dc, hdc, and sc.
A simple conversion chart for UK terms: Crochet Stitch Comparison Chart
 

Materials: 
  • DK or worsted-weight yarn in black plus one or more contrasting colours. I used Morris Norway 8ply in 'Black', and Bendigo Classic 8ply in 'Silver', 'Cherry Red', and 'Tasman Blue'. You will need about 16 yards of black for each coaster, and smaller amounts of the contrast colour(s).
  • a 4mm crochet hook,
  • a needle for weaving in ends.

Pattern: 

Round 1 (Colour A): Make a slip-knot, chain 4, and join with a slip-stitch to start of chain. Ch2, and work 11 dc (double crochet) into the centre of the ring. Join to the top of the initial ch2 with a slip-stitch, and fasten off Colour A.

Round 2 (Colour B): Join Colour B, ch2, and work 1hdc (half-double crochet) into same place. Work 2hdc into each stitch of the previous round. Join to top of initial ch2 with a slip-stitch, and fasten off Colour B.

Round 3 (Black): Turn to other side of coaster, and join Black. Ch2, 1 hdc into same place. *1hdc in next stitch, then 2hdc in next stitch,* repeat from * to * until 1 stitch remains, 1hdc in final stitch. Join to top of initial ch2 with a slip-stitch.

Round 4: Ch2, 1hdc into same place. *1hdc, 1hdc, 2hdc,* repeat until 1 stitch remains, hdc in final stitch. Note: the 2hdc will fall between the 2hdc of the previous round. Join to top of initial ch2 with a slip-stitch.

Round 5: Ch2, 1hdc into same place. *1hdc, 1hdc, 1hdc, 2hdc,* repeat until 1 stitch remains, 1hdc. Join to top of initial ch2 with a slip-stitch.

Round 6: Ch1, 1sc (single crochet) into same place. Sc into each stitch of the previous round. Join to first sc with a slip-stitch.

Fasten off yarn, weave in ends, and block to help them lie flat.

A side
B side


© Amy van de Laar 2014.

Making pompoms

I made three pompoms recently for my Bubble & Squeak hat. I originally wanted one, but when I held it against the hat it looked a little small - so I made two more. I think they look really cute in a cluster. :)

Here's what I did:

1. I made a pair of templates by tracing around cylindrical things (a mug and a small perfume bottle) onto some scrap cardboard (a chocolate packet). I cut it out, and repeated for the second one.

2. I wound a little ball of yarn, small enough to fit through the holes in the templates.

3. Holding the two templates sandwiched together, I wound the yarn around them until I decided I'd covered them pretty well. If you run out of yarn, it's easy to add another little ball - just wind the new yarn over the loose ends to keep them under control.


4. Get the point of your scissors down between the two cardboard templates, and carefully snip through the yarn all around the edge. I used fuzzy, woolly yarn which stayed put during the snipping - if your yarn is less 'grabby', I'd suggest plugging the centre of the circle with a folded paper towel or something, to stop the snipped strands of yarn escaping.


5. Wrap a new strand of yarn around the middle of the pompom, between the two templates. Tie it tightly with a secure knot.


6. Slip off the cardboard templates, trim any longer strands that are sticking out, and fluff up your pompom: roll it in your hands, or hold it by the tail and whack against your hand/leg/whatever.


 7 (optional). To make the tail more substantial, take a crochet hook and with both strands, make a slip knot as close to the pompom as possible. Chain 4, and tie off.

8. Make more pompoms as desired, and attach to your hat!

Dyeing with eucalyptus


I tried a new thing: dyeing wool using bits of eucalyptus tree. I was prompted to try it by reading that eucalyptus is one of the few natural dyes that don't need a mordant (i.e. an additional chemical) to 'fix' the colour. These no-mordant dyes are called 'substantive' dyes - others include lichen and black tea, both of which I've tried in the past. Also, I read that different varieties of eucalyptus can give different colours. I was hoping for a rich orange, but obviously the tree I selected had other ideas... :p

I didn't need to go far to find my materials, as there's a little huddle of eucalyptus trees across the road from our place, by the train tracks.
Willie and I collected a couple of smallish branches which had blown down in a storm, and I stripped off the leaves and some of the bark.

The trees, with bonus shopping trolley

Hello branches, I have plans for youuu...

A closer look

Flowering tops; twigs and bark; leaves

I based my dyeing method on these instructions. It's kind of a long process, but worth it for an experiment! And simmering eucalyptus leaves smells really nice - it cleared my sinuses pretty well too (much appreciated after putting up with the Flu That Wouldn't Die).

I used 150g leaves/etc for each 50g skein of yarn (which was undyed Vintage Purls Lace). Equal weights of dyestuff to yarn is usually recommended, but I was going for intense colours (hah). I soaked the plant-parts in water overnight, and then brought them to a low simmer before leaving them to steep again for 24 hours.

I decided to try just the pot with the leaves and the one with the flowering tops first, before committing more of my undyed yarn to the experiment. I brought both pots to a low simmer for an hour, and then added a warm, presoaked skein of yarn to each pot. I was extra gentle with the yarn, because it's not superwash and could felt with too much heat and friction. I simmered the yarn-and-eucalyptus soup for another hour, and let the pots cool overnight.

I removed the yarn, picked out the random bits of plant, and let them dry before giving them a rinse and drying again (apparently you can retain more colour that way).

Did I have orange? No, I did not. I had a pleasant-nonetheless warm golden fawn colour. Both skeins looked similar, although the one from the leaves-only pot was less warm-toned. I re-dyed that one darker, using some extra leaves and bark that we collected from a park.

After, and before

I think they look nice together, so I'm going to come up with a two-colour project for them. Something crocheted, perhaps. :)